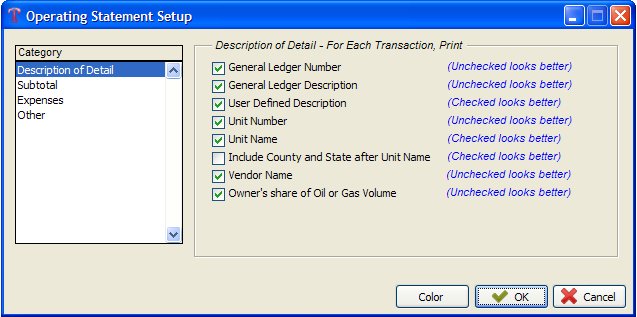
This program allows you to customize the Operating Statement to your specifications. Allows you flexibility to design your very own format. You may use the standard Setup for Operating Statements or change filter conditions. When expenses are netted from revenue, you may show them subtracted from the revenue on the Operating Statements.
Select File - Set Up Options - Operating Statement Format
NOTES ON OTHER OPTIONS
Print Company Phone & Fax Number:
You can add this feature to print all Operating Statements. This is the Company's information.
Take Heading off after First Page:
Operating Statements are printed in owner order beginning with page 1 for each owner. If owners Operating Statement requires more than page 1, you may want to remove the operating company's address and the owner’s address on the following pages. The company name and owners name will advance to the top after page 1 and save lots of paper when you select Y. Only the first page needs to fit the window envelope.
Print Owner Summary as Single Block:
Operating Statements print a summary of all units for each owner. There may be as many as 13 lines as a single summary block. You may want to use all the space available on the Operating Statement. When you select ‘N’ for (No) Print Owners Summary as a single block the Summary information of all units for owner will split the block and continue printing on the next page.
You may change the filters to see which format you like best. Print or display the format you select prior to printing Operating Statements. The Operating Statements will use the format you select in this program. When you select print Operating Statements from the JIB program. The format you select will be printed with the filter for Operating Statements.
Print for Suspense Owners:
You have the option to print, or not to print, for someone who is on suspense. If you select ‘Yes’ then you must print the Summary Statement under JIB then ‘Preliminary Reports’ before printing your Operating Statements. This is necessary for the program to determine who will get a statement.
Print for Minimum Check Owners:
You have the option to print, or not to print, for someone who has a Minimum Check Amount that has not been met. If you select ‘Yes’ then you must print the Summary Statement under JIB then ‘Preliminary Reports’ before printing your Operating Statements. This is necessary for the program to determine who will get a statement.
Print Owner address 1 and address 2 on same line:
If you have an address line 1 and address line 2 in the Owner/Customer file, this option will print them on one line.
Print Total Amount Received in Last 30 Days:
Another option you have is to show the Total Amount Received in Last 30 Days on your Operating Statements. This program will check A/R to see what payments have posted 30 day’s prior to your beginning transaction date you input on your filter for your Operating Statements.
E-mail Operating Statements
This option will allow you to e-mail Operating Statements to Owner's who have an e-mail address in the Owner/Customer file and who are marked to have Operating Statements e-mailed.
Ask to e-mail Operating Statements after printing
This option will flag you to e-mail Operating Statements immediately after Operating Statements are printed.
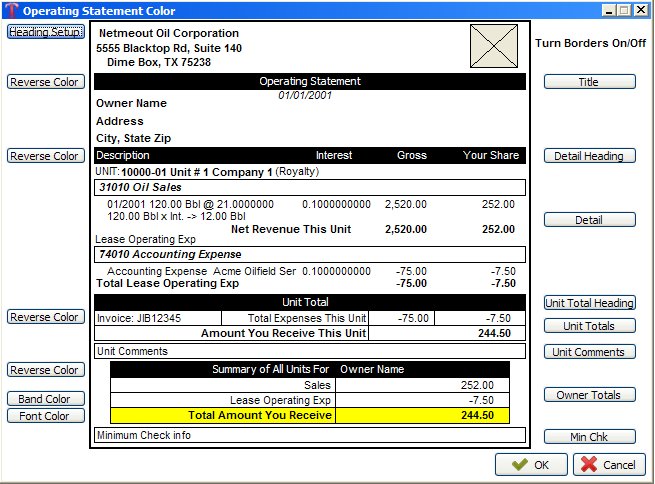
COLOR BUTTON
These advanced settings allow you to import your own Company Logo, select the banding on the headings or just have the headings print like normal text. You also have the option to change the font and banding color located around the ‘Total Amount You Receive’.
Example: You want a box around the title of the Operating Statement but don’t want it in a band that’s all black with white text. You would click on the ‘Reverse Color Button’ to turn the black band to white. If you wanted to completely remove the band, click on the ‘Title’ button located on the left-hand side.
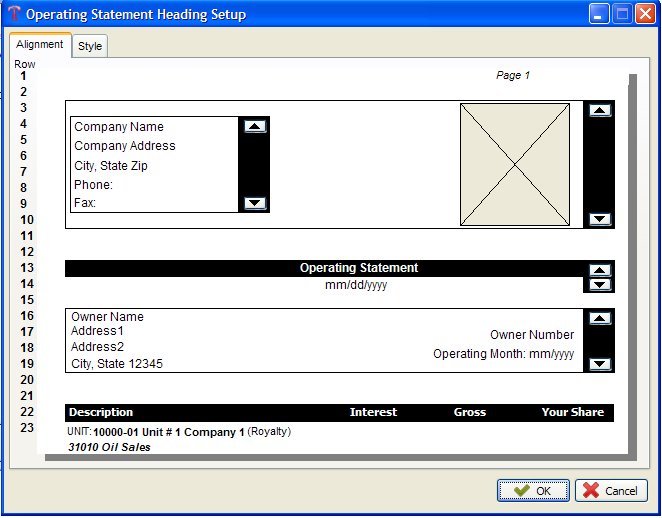
By clicking on the ‘Heading Setup’ button, top left-hand, this will take you to a new screen starting with the Alignment. You can click on the arrows to move your Company Name, Address, Operating Statement Title, Owner Name, etc… up or down to where they meet your needs. We did this so the Operating Statements would fit into your Window envelopes.
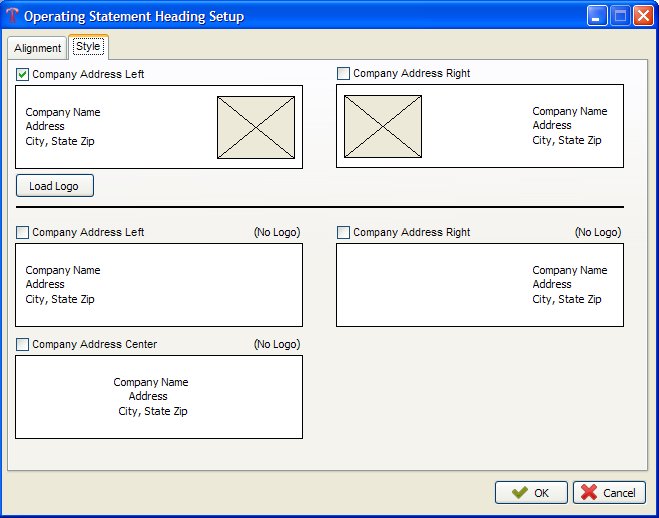
The Style Tab will let you choose where you want the Company address to be located, right, left or center. You are also able to load your own Company Logo or image from the ‘Load Logo’ button located under ‘Company Address Left’. If you do not have a logo, or wish not to use one, you may skip the top options and move to the bottom options.
Created with the Personal Edition of HelpNDoc: Easily create HTML Help documents


